Thursday, September 5, 2013

Throwback Thursday: House For Sale

A few years ago we woke up on an April morning to a "For Sale" sign in our front yard.  The listed price of the house was clearly displayed: $100, sold by esteemed real estate agent Dwight Schrute.  The best part of the sign was where the "by owner" was replaced by "by neighbors."  Of course it was April fools day and some of our funny friends played this clever prank on us.  Funny right?  
Birdie and I and the "For Sale" Sign

The funniest part of the prank came throughout the day.  If you would have asked me if anyone would take the sign seriously, I would have guessed not.  We left it up all day because it was awesome.  It attracted a few unexpected visitors.  The best was the twenty-something-year-old who knocked on my door with his wallet in hand.  He seemed disappointed when I told him it was merely an April fools day prank.  Here he was thinking he'd landed his first real estate deal and I had to dispatch him to that sad reality that although our house is not the most valuable home ever, it was worth at least $200 or more.  Nellie had several great encounters due to our sign also.  Guess it goes to show you it wasn't a very good joke after all.  A good joke never needs to be explained.  

Tuesday, September 3, 2013

Tubby Tuesday: Moochies

Welcome to Tubby Tuesdays!  One thing I really like is food.  I mean, I really really like food.  When I work out, it's because I want to be able to eat more food.  When I don't work out, I still eat a lot of food.  There are a lot of great places that I have eaten at and wish I would have known about them sooner.  Think of Tubby Tuesdays not as a review, but as an unpaid whole-hearted endorsement of places that could change your food life FOR-E-VER!  With installment number one I give you Moochies.


Moochies: It's not much to look at...but boy oh boy!
Moochies is like a secret restaurant that isn't really a secret at all, thanks to Diners, Drive-inns, and Dives.  Still, there are an alarming number of people who have never had the privilege of having a Moochies steak sandwich, dripping with Jumpin' Jalapeño Sauce charging through their lips!
I was introduced to Moochies a couple of years ago.  It had already been featured on DDD, so we were far from the first to discover this mecca of meatball.  Some buddies from work told me I had to try it, so we were off to Salt Lake.  Moochies original location is on 800 South and around 200 East.  It was originally a pottery studio, but the owners wife decided she was going to sell some great sandwiches and Moochies was born.  When I first walked in I figured the food must be great, because the place was as hole in the wall as I had ever seen.  Exposed brick in places on the wall, eclectic decor that wasn't even kitschy, and not enough seating for half the people in line (I soon learned that Moochies has a house next door that provides extra seating so--no worries.  Also: their bathroom has a bathtub that is filled with dirt and has plants growing in it--when's the last time your favorite restaurant did that?)
Picture of Moochies Food (Courtesy of UrbanSpoon)

We placed our order, I ordered a 12" steak sandwich with peppers and mushrooms added, one of my buddies ordered the 12" meatball and we split it so we both got half of one.  The steak sandwich was great.  Pretty much what I'd expected, good meat, good peppers and onions on pretty good bread.  What I didn't expect was Moochie's Jumpin' Jalapeño Sauce that changed the way I eat.  It is a creamy sauce that seems to be mayo based with diced jalapeños in it (very hard to properly duplicate by the way).  I'm not sure if that sounds good to you or not, but you owe it to yourself and your posterity to try it at least once!  It's wonderful and flavorful and makes EVERYTHING I've tried it on taste better.  Really.  I bought a bottle and have tried to always keep a full one in the fridge at home.  This is difficult because it is so good that I will eat when I'm not really hungry anymore just to have more sauce.  (The best foods that I have had Moochies sauce on are: pizza, cold pizza, grilled cheese, and quesadillas--I tried it on a donut once as a dare from Birdie (who was delighted and grossed out at the same time) and it was even good there!)
Two week supply of Moochie Sauce

The meatball sandwich was a masterpiece as well.  The meatballs are HUGE and messy and amazing.  It goes without saying that it also goes wonderful with Moochies sauce.  A few visits down the road we discovered fried ravioli (good discovery Nellie!) and it's only enhanced the Moochies experience.

A couple of months ago they opened a second restaurant in Midvale (about 7700 South State), I visited and was just as pleased with this location!  I had a chance to talk with the owner for the briefest of moments and was able to beg him to open a location in Happy Valley.  He also told me they had toyed with the idea of selling Moochie sauce in one gallon jugs--here's hoping.

Overall, Moochies is high on my list of places to recommend.  I'm not sure I've enjoyed a sandwich more consistently over many, many visits, but as Lavar Burton used to say on Reading Rainbow: don't just take my word for it!

Post Script:  I recently hit a high-water mark in my parenting life.  I was making quesadillas for lunch with the kids.  When it came time to eat I couldn't find my Moochies sauce.  Scott ran down to his room to grab the bottle out of his locker.  I was confused about why it was down there and inquired if I had somehow left it in the basement.  Turns out, Scott had thought it would be funny to hide it until I wanted it-- he felt terrible when I told him that it was now unsafe to consume because it hadn't been refrigerated.  I was proud because I was able to laugh and didn't get mad at a mistake my awesome son had made.  (You would think it was awesome if you'd had the sauce--promise).

Acknowledgement: Jake Kuresa is the man responsible for my Moochie's introduction--for that I thank you.  Oh, and thanks for stopping that guy that would have tackled John Beck before he could complete the now famous Beck-to-Harline pass to win the 2006 BYU Utah game.
Moochie's Meatballs & More on Urbanspoon

Monday, September 2, 2013

Teaching Kids to Do Hard Things

Still Smiling: after the race
Today Tutty Tutt ran a 5K by my side. We Ran in the Payson Onion Days race along with 200-300 others.  We were joined by my dad and two of my three brothers. I pushed Birdie along in the jogging stroller. When we talked about Scott running, I was concerned about his ability to finish a 5K, it had been a few months since he had run a mile. With no training, I gave him the only advice I could think to share: I told him it would be hard, that it would hurt, but if he stopped to walk that it would prolong his agony.  I'm sure some of you would wonder about me so advising my eleven year old son. There are many proponents who feel like kids are pushed to do too much, but I don't see it that way.

When I was in high school I decided to run cross country. It was a lot of fun being on the team and I enjoyed the friendships, but it taught me some valuable life lessons as well. In preparation for our season, we would meet on summer mornings to run as a group. As a sophomore-to-be, I was not slated to run varsity, and would not factor much into the team. On quite a few of our runs I would wait until I felt some pain and would walk for a while before I ran again.

One day my teammate Sam mentioned to me that I was cheating myself by walking. He told me that everyone on the team felt like walking, but actually walking did not help to train the body to be comfortable with higher levels of pain. I'm not sure Sam ever realized the impact of those few words on me. I'm certain it seemed obvious to him and somewhere inside I knew those truths as well. Being called out ended up elevating my "running career" substantially.

Today as Scott and I ran, I could see him go through cycles and stages. There were times when he told me he couldn't do it. Other points where what he was accomplishing seemed to excite him. There were times where he was in so much pain that he was a little unpleasant with me, but he never stopped to walk. He wanted with every part of his body to stop, but he kept going on. He did a very hard thing and taught himself someone about what he is capable of.

A few years ago We had a wonderful neighbor that is very special to our family. After breaking down some walls we got to a point where we would mow her lawn in the summertime. Scott wanted to help so we began by having him walk with me behind him helping to guide him with the mower. Eventually he became proficient enough that he could do it himself.  In between starting and mastering lawn mowing was a lot of tough times.  He would get discouraged by a lack of progress or would just be flat-out exhausted.  When he was frustrated, he continued on with encouragement from us. Today he mows either our front or back lawn weekly and does a great job.  He has mastered something that many kids his age have not yet, because he was willing to do something that was hard for him.

Why challenge him? Why ask him to do hard things? Is it because I don't want to do the work myself?  Maybe a little. The reality is I know that life is hard. I know there will come a point where he won't have me by his side to teach him to work and to push outside of his comfort zone. When that time comes I want him to be capable and competent. Most importantly he needs to know the agony that success requires. Very few success stories come from people who didn't first work and persevere through plenty of hard situations.

We don't do our children any favors by coddling them. We can show love and confidence in them. We can teach them how to do hard things. We can work side by side with them. Until we are willing to let them struggle and pay a price, they will never truly grow. Adversity does not build character, it simply shows what is already there. It is our job as parents to shepherd our families through difficult circumstances so they can learn to do hard things. When they know for themselves that life is hard, but they can succeed and do hard things their dependence on parents diminishes.
Lulu, Birdie, and Tutty Tutt

Today's race was a chance for Scott to learn something about himself and he did learn. Tomorrow will bring its own challenges and circumstances, we will not rescue him from his trouble, we will help him work through it himself. When he stumbles or needs encouragement we will be there to cheer him on.  When he fails on occasion  we will teach him that true failure comes when we stop trying to succeed.  I'm proud of Scott and I did feel sympathy for him as he gingerly walked down the stairs this evening to go to bed.  That pain that he earned is real.

Thursday, August 29, 2013

Throwback Thursday: "Thomas Is Has Friends!"

Our Little Tutty-Tutt Age 3
Once upon a time Tutt, or Scott as we call him, was just a little thing.  He's 11 now, but I remember when he was 3 and 4.  He was one of the most handsome, lovable and adorable boys I have ever met.  In addition to being handsome and sweet, he also LOVED Thomas the Tank Engine.  When I say loved, I mean: he had a ton of the trains, a bunch of movies, and books and he would only ever talk about Thomas.  


Thomas and All His Friends
The start of every Thomas show has a theme song that starts: 

"They're two they're four they're six they're eight
Shunting trucks and hauling freight,
red and green and brown and blue
they're the really useful crew;
All with different roles to play
Round Tidmouth sheds or far away,
Down the hills and round the bends
Thomas and his friends."

After several million views of the videos Nellie and I knew all the words.  Having been teased a lot growing up, it was natural for me to tease my little boy.  I would sing the words correctly until the last line where I would sing "Thomas has no friends," to which Scott would reply in the most indignant voice he could muster "Thomas is has friends!"  It was so cute, and he was so predictable.  I could do it fifteen times a day and the reaction was always the same.  

As we taught Scott to pray we would sometimes feed him a prayer line by line.  One night Nellie was guiding him through the process.  "Thank you for this food..." she would begin "thank you Thomas...." Scott would say, "Thank you for our family..." "thank you Thomas....." "Thank you for our house, car, livelihood, etc" "thank you Thomas, Thomas, Thomas..."  It was one of the cutest prayers ever...a little boy sincerely thanking The Lord for everything that was important in his current world-view.  As I remember some of Scotty's stories they always make me smile.  

Wednesday, August 28, 2013

Finding Gratitude

One of my friends posted a video to his Facebook page that I wanted to share.  Back in July of this year, ESPN did a feature on Richie Parker.  He works for Hendrick Motorsports and seems like a really nice guy.  He was also born without arms.  Watching this video reminded me of some of the blessings that I take for granted on a daily basis.  I am grateful for the example of people like Richie.  It's pretty inspiring to watch him go about his day.

What do you think?

Tuesday, August 27, 2013

Life with my Lu

By Nell.  Last night we headed up stairs after watching a movie, and a familiar smell assaulted my nose.  Every type of perfume I own.  Combined.  Familiar because this same situation occurred the night prior, only tonight with the addition of the blue-eyeliner-turned-lipstick.  Sound asleep and unaware of her stench, I'm sure she felt lovely in dreamland.

Trev commented this morning that she was like a walking stick of potpourri, and then the name "Grandma Glade" was born.  Subsequent baths have still not fully removed the essence.

.........

This morning after the kids were out the door to school, Lulu asked for her "freckas" (read: Breakfast).  She asked for strawberry cereal, which I know to mean the Special K flakes with the freeze-dried strawberries sprinkled on top (thank you Grandma Hansen).  I got out a little green plastic bowl, poured the flakes and sprinkled the berries, and sat it down in front of her.  Lu's face twisted sour as she said, "No strawberries! No strawberries!"  I got a new purple bowl out of the cupboard, not wanting to fish out all the strawberry pieces, and poured her a new bowl of just flakes.  I didn't even get it set on the table before she whined, "No Mama! I want the green bowl!  GREEN BOWL!"  I sighed loudly, the kind of sigh that usually makes Trev ask what my problem is.  I dumped the original green bowl with strawberry-infested contents into a 3rd bowl, poured the untainted purple bowl contents into the now unoccupied green bowl, and set it in front of her.  She looks discerningly at the bowl, examines it, then starts crying, "I wanted strawberries, Mama!"

"Seriously?!" was all I could think to say.  I walked to the original green-bowl contents now in a 3rd pink bowl, fished out 3 or 4 strawberries, walked to the table, held them over her bowl and said, "You want these strawberries?" "Yes!" Lu squealed in delight.  I dumped the berries on top, splashed the milk, and walked away.  Lulu-2, Mama-0.    

Friday, August 23, 2013

THE Table


Today is a good time to talk about our new kitchen table.  The table that caused more heartache and stress than any other kitchen table I have ever made before.  I know I sound a little over-dramatic -if you read the whole post I believe I can save anyone following my steps quite a few mistakes.  Since I made most of the mistakes and learned from them.

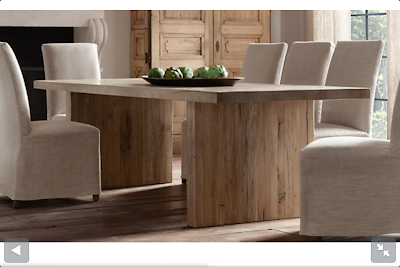
First of all: let me show you a picture of what I wanted to build.  It was a beautiful slab table that I saw in the Restoration Hardware catalog.  Restoration Hardware is the place I would model my entire home off of if I only had the budget.  Unfortunately, I do not--so instead I try to duplicate and replicate.  They are definitely worth checking out, especially if you know someone awesome that has everything and need to get them an amazing piece of furniture.  Many of the pieces they sell are rustic and huge.  They are often made from reclaimed wood and each one is unique and wonderful.
Restoration Hardware Plank Table in All its Splendor and Beauty
After having built the top for the map case, I knew some things that I wanted to change for the table and its top.  First, I didn't want to have any gaps in the wood.  In fact, I wanted the top to fit together so tight that no one would know that it was individual planks.  I also knew that I wanted it to be big enough to fit the pew that we already had for the table.  It is a beautiful old church pew that we had been able to take from one of our old churches before it was razed.  We had used it for years at our old kitchen table, which really didn't fit.


After consulting various table designs on Ana-White I had my plans all made up and went to the orange hardware store.  The day I went I ended up taking Tutt, Yaya, Lulu and one of their friends.  This was tough because I was trying to find the most perfectly straight boards I could find.  For the top, I decided to construct it from 2x12's, four of them to be precise (huge mistake!  read on).  For the slab legs I decided to join a bunch of 2x4's side by side while turning out the end pieces to give it the illusion of a thicker slab.  I ended up out the door with all the lumber I needed for around $100.  Given the lifetime supply of 2 1/2" pocket hole screws I had already bought, this was my only real expense!
Our Table: Before

The first step I took was to begin building the base of the table.  I cut the 2x4s into sections that were 29 1/4" high and squared them up using our jointer Butch.
10 2x4's Squared up and Ready for some Glue and Screws
After squaring them, I drilled ample pocket holes, glued and screwed them together to form the planks for the legs.  
One Plank Leg Joined Together On Top of our Old Table

After completing both "planks" I used a couple of 2x4's to fasten the planks together and ran a 6x8 down the middle to give it added stability and the base was "finished."  I was actually a little nervous once I'd squared everything up and screwed it all together.  
The Finished Table Base
The base wasn't as sturdy as I'd hoped and gave way quite a bit, which turned out to be no big deal once the top was on it.  Next it was time to make the top. 

I was pretty nervous about doing the top because I wanted it to turn out perfect.  First step was to square off the 2x12's we would be using.  Once they were squared up, it was time to arrange them in the most interesting way.  Next came more drilling.  I love using pocket holes, but sometimes all that drilling can sure become tedious.  Finally, it was time to glue and screw.  After piecing the top together I sanded and sanded it to get it smooth and to level it out.  
Glued and Screwed and Sanded Too!
There was one piece of wood that didn't seem to line up right even though it looked square to the naked eye.  I simply sanded some more until it was all even.  Probably should have seen it coming.  After the sanding, we added some 2x6s breadboards to each end.

One feature I wanted the table to have were some extension pieces we could slide in when we had company over.  In the end, they've become a little more permanent because I really like them on the table, but we can always remove them if we want.  

To make these we simple joined a couple of 2x6s together and attached some 2x4s on the underside.  On the base we first marked the spot for the extensions and then repeatedly cut the area with a circular saw.  After slicing and dicing a while, we used a wood chisel to clean it up.

Once that was completed, it was time to put it together for the first time.  The top was so blinking heavy it about gave me a hernia bringing it in from the garage/shed/shop.  When we first put it on, I think I loved it right away!
The Table When First Put Together

Then it was time to stain, what a joy that is.  Nellie and I wanted the table to be gray like the map case top, but warm as well.  We used Minwax Classic Gray for the first coat.  We would coat one board, move on to the next, and then wipe off the first board.  This allowed the table to take in the color without too much.  
The Stain on the Underside of the Table--You can see all the pocket holes in this shot

Next we added smaller amounts of the Minwax Dark Walnut and wiped them off much quicker.  The brown would warm up the cool gray in a way that was really neat.  I really liked the color we ended up with.  

After staining the table in its entirety, we added about a gazillion coats of clear poly.  The finished product:

Now,  let me tell you about what I would do differently next time: I made a few mistakes on this table that are near deal-breakers.  In fact if anyone loves the table and wants to buy it from me, I would sell it in a heart-beat just to make little modifications for my liking.

The biggest blunder I made was joining together 2x12s for the top.  I thought it would give it a more elegant look.  Turns out that finding straight 2x12s is the harder than finding gold.  Second, after having made this mistake I read in the instruction manual for my Kreg jig (always read the directions!) that you shouldn't join wood thicker than 8" together.  The table first developed a small crack only a couple days after it was finished.  I read a lot of workworking websites and concluded I must have made it so the wood couldn't expand and had thus incurred the crack.  We experimented with what we could fill it with.  First we used glue, then wax, then wood filler that was "stainable."  They were all mediocre, but it was alright.  I waited to see if anything else would happen.

Nellie was at home one afternoon a couple of weeks in to our new tablehood when she heard something that sounded like a gunshot.  She went to the source of the noise in the kitchen where a crack the length of the table had formed!  After a few days the crack had expanded to be 1/4 to 1/2" wide.  We could clearly see the floor through it.  I thought we could just install a chute under it and connect it to a vacuum hose and use it to clean our table off....but it was still a huge, ugly crack.

I was discouraged.  I thought that table was crap at this point.  I had felt so proud of it before and now it was a testament to my foolishness.  Thinking I could build a table that we'd actually like: ha!  It wasn't until I visited the garage a few weeks later that I figured out what had gone wrong.  Two of the remnants of the 2x12s I had used for the top were sitting on top of each other.  One of them remained flat, the other one had curled to the point it looked like a "C" with some curve to be desired.  I picked the piece up, applied some pressure and it snapped in half!  Figuring out that I had just screwed up in my choice of wood made me feel much better.  It was as though knowing the cause of the problem made me feel like it would be alright.

Nellie and I set out to find a solution that could fill the crack once and for all.  I figured I could make another top if it didn't work, but would rather find a solution for the time being at least.  We ended up using a product called Bondo Glass.  It's a fiberglass ooze that mixed with a hardener smells like death.  We dyed it with some black dye and fed it into our cracks.  After some drying and sanding and some more coats of poly, our table is better than before.

Does our table have some character?  Absolutely.  Are there some things I would change if I made it again?  Absolutely.  Mostly preferences about how long I would have made it etc.  I can say that I love the table and it's beautiful to me.  
Related Posts Plugin for WordPress, Blogger...